Process Builder awesome changes

You already know the power of automating a business process based on record changes in your Salesforce Org. But what if some of your business-critical events don’t happen inside your Salesforce database?

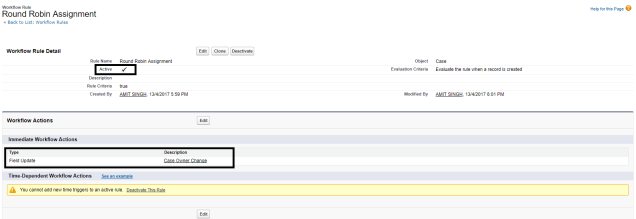
  1. Quickly Reference Specific Users and Queues in Your Processes: – In the current setup of Process Builder, we can specify Hardcode Ids of User and Queue if we want to assign cases or leads to queue or any user. Salesforce has made changes in Winter 18 and now you can specify the Specific user Id and you can also search for specific user or queue.

    User and Queue aren’t available in criteria or action rows that were created before Winter ’18. To use one of these new types in an existing process, create a new row.

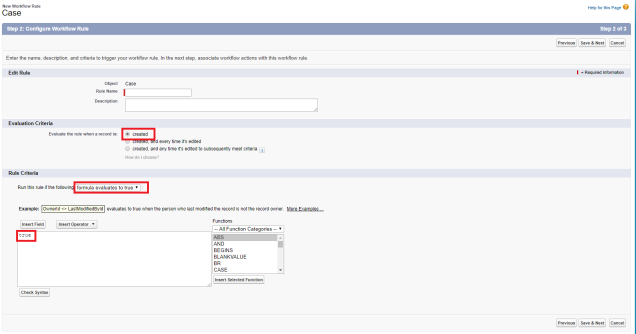
    Example: – When you configure an action to create a case, you can choose from these value types for Owner ID. We’re assuming that you have at least one queue enabled for cases.

    ID
    Reference
    Global Constant
    Formula
    User
    Queue
    To assign the case to a queue, choose Queue under Type, and start typing under Value to find the right case.210_process_userfield_example

  2. Start a Process When a Platform Event Occurs: – At its most basic level, a process is similar to an if/then statement. Until now, the “if” has been some version of “if a record is created or edited and it has these values.” With platform events, you have full control over the “if.” You aren’t restricted to triggering a process when records are created or updated. As long as Salesforce can receive a REST call about the event, you can start the process.

    1- Create a process that starts when A platform event occurs.
    2 – For the trigger, select a platform event and match the event to a record in your org.
    3 – Configure the rest of the process. 

    Example

    Using platform events and the Salesforce REST API, your printer publishes a Printer Status event at the end of each workday. This event notification includes the printer’s serial number, how much ink and paper it has, and how many pages it has printed in total.

    When Salesforce receives the Printer Status event, your Printer Management process uses the serial number to find a matching asset in your Salesforce org. If the process finds a match, it evaluates the event’s data.

210_pb_events

Reference: – Start a Process When a Platform Event Occurs

Round Robin Assignment Using Trigger and WorkFlow Rule

In this tutorial, we will learn how to assign cases using RRD for example purpose.

Step 1 – Round Robin Assignment using Workflow Rule: – Use WorkFlow rule for RRD whenever you know the number of users you need to distribute LEAD/CASE for example 3, 4, 5 users. For limited users, Salesforce has already published an article and you can give it a try here How do I create a round-robin assignment for Leads or Cases to users?

But in most of the cases, we do not know how many users and queues will be involved to which we want to distribute the CASE?LEAD to this scenario I have written a custom solution read step 2.

Step 2:- Round Robin Assignment using Triggers: –  If you do not aware that how many users will be there in the queue then you need to write a custom logic using the trigger.

Prerequisites: –

  • Basic Understanding of Apex
  • Basic Understanding of Workflow Rule
  • Basic Understanding of Queues.

1- Create a Queue and add users to that queue. Setup -> Administer -> Manage Users -> Queues -> New and enter Label, Queue Name, Select Object for example Case and Select users that you wanted to Add.

2 – Create a Workflow rule:- In this step, we will create a WFR which will update the case owner to the Queue that we have created. Setup -> Create Workflow & Approval Process -> Workflow Rules -> New Rule -> Case -> see screenshot below. (You can also create the same workflow into LEAD object case is used for an example).

Queue

For Workflow Action Select New Field Update and change the Owner to the Queue that we have created earlier. Click on Save and then Click on Done and activate the workflow.

Final picture of workflow will look like below

Complete Workflow

3 – Create a new custom autonumber field into Case/Lead Object. Setup -> Customize -> Cases -> fields -> scroll down to “Case Custom Fields & Relationships” section and click on new button. Data Type Select AutoNumber Click next Enter field Label like Case # and display format(Case-{0000}), starting number(1) and check “Generate Auto Number for existing records” checkbox if you want to generate auto number for existing case/leads other wise leave it blank. Next, Next and do not add this field into Layout and Click on Save.

CustomField

4- Create Apex class and Apex Trigger:-  Here we are, we are done with configuration part and in this step we will create a trigger and it’s handler class which be responsible for assigning the cases/leads using Round Robin Algo.

  • Setup -> Develop -> Apex Classes -> New -> and Go to THIS CLASS and paste the code here
  • Setup -> Customize -> Cases -> Case Triggers -> and paste the code provided HERE.


Now in the final step test the functionality by creating multiple cases and cases will be assigned to those users that are available into queues using Round Robin Algo.

Hope this blog was helpful to you. You can also get the complete document Here.