Apex Trigger Best Practices – Salesforce

Apex Triggers

Before we go for best practices let’s know some basic about apex trigger. Apex can be invoked by using triggers. Apex triggers enable you to perform custom actions before or after changes to Salesforce records, such as insertions, updates, or deletions.
A trigger is Apex code that executes before or after the following types of operations:

insert
update
delete
merge
upsert
undelete

For example, you can have a trigger run before an object’s records are inserted into the database, after records have been deleted, or even after a record is restored from the Recycle Bin.

There are two types of triggers:
Before triggers are used to update or validate record values before they’re saved to the database.
After triggers are used to access field values that are set by the system (such as a record’s Id or LastModifiedDate field) and to affect changes in other records, such as logging into an audit table or firing asynchronous events with a queue. The records that fire the after the trigger is read-only.

1 – Logic-less trigger – All trigger must be logic-less means all the code should be in a separate apex class knows as handler class.

2 – Bulkify your Trigger – Make sure that your trigger will not cause any issue while importing mass records.

3 – Avoid hardcoding Ids – Do not use hard code ids anywhere in Class or Trigger.

4 – Avoid SOQL queries and DML inside for loops so that governor limit cannot be hit.

5 – Use Collection List, and Map to avoid DML and SOQL inside for Loop.

6 – Bulkify your helper class methods!

7 – Do not develop multiple triggers on the same object. Creating, one trigger every object will let you decide in which order what code need to execute.

8 – Always query large data set with the maximum possible filter to avoid the governor limit.

9 – Use @future Appropriately

10 – Use of the Limits Apex Methods to Avoid Hitting Governor Limits

11 – Use Apex Trigger framework.

12 – Use utility class where is required and possible

Apex Code Best Practices

Trigger Frameworks and Apex Trigger Best Practices


Round Robin Assignment Using Trigger and WorkFlow Rule

In this tutorial, we will learn how to assign cases using RRD for example purpose.

Step 1 – Round Robin Assignment using Workflow Rule: – Use WorkFlow rule for RRD whenever you know the number of users you need to distribute LEAD/CASE for example 3, 4, 5 users. For limited users, Salesforce has already published an article and you can give it a try here How do I create a round-robin assignment for Leads or Cases to users?

But in most of the cases, we do not know how many users and queues will be involved to which we want to distribute the CASE?LEAD to this scenario I have written a custom solution read step 2.

Step 2:- Round Robin Assignment using Triggers: –  If you do not aware that how many users will be there in the queue then you need to write a custom logic using the trigger.

Prerequisites: –

  • Basic Understanding of Apex
  • Basic Understanding of Workflow Rule
  • Basic Understanding of Queues.

1- Create a Queue and add users to that queue. Setup -> Administer -> Manage Users -> Queues -> New and enter Label, Queue Name, Select Object for example Case and Select users that you wanted to Add.

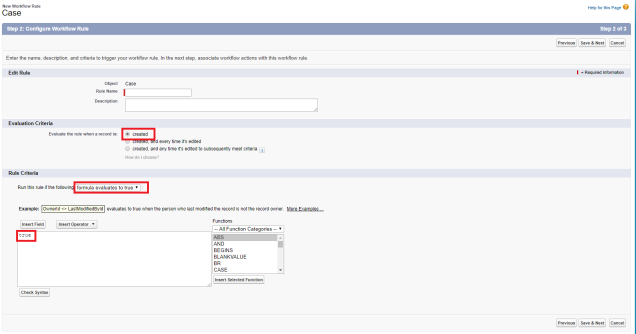
2 – Create a Workflow rule:- In this step, we will create a WFR which will update the case owner to the Queue that we have created. Setup -> Create Workflow & Approval Process -> Workflow Rules -> New Rule -> Case -> see screenshot below. (You can also create the same workflow into LEAD object case is used for an example).

Queue

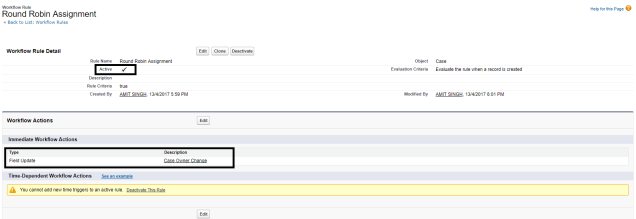
For Workflow Action Select New Field Update and change the Owner to the Queue that we have created earlier. Click on Save and then Click on Done and activate the workflow.

Final picture of workflow will look like below

Complete Workflow

3 – Create a new custom autonumber field into Case/Lead Object. Setup -> Customize -> Cases -> fields -> scroll down to “Case Custom Fields & Relationships” section and click on new button. Data Type Select AutoNumber Click next Enter field Label like Case # and display format(Case-{0000}), starting number(1) and check “Generate Auto Number for existing records” checkbox if you want to generate auto number for existing case/leads other wise leave it blank. Next, Next and do not add this field into Layout and Click on Save.

CustomField

4- Create Apex class and Apex Trigger:-  Here we are, we are done with configuration part and in this step we will create a trigger and it’s handler class which be responsible for assigning the cases/leads using Round Robin Algo.

  • Setup -> Develop -> Apex Classes -> New -> and Go to THIS CLASS and paste the code here
  • Setup -> Customize -> Cases -> Case Triggers -> and paste the code provided HERE.


Now in the final step test the functionality by creating multiple cases and cases will be assigned to those users that are available into queues using Round Robin Algo.

Hope this blog was helpful to you. You can also get the complete document Here.