Hi All, Hope you all enjoyed my previous Integration related posts. I have come up with another integration. In this post we will make connection between Salesforce and Quickbook System using Apex, VF page.
Earlier Quickbooks uses oAuth 1.0 for the authentication but now it has updated it’s API and using oAuth 2.0 so in this Integration we are going to use oAuth 2.0
Step1 – Create a Custom Object OR Custom Metadata to store the information about Access and Refresh Token. If you are thinking about to use Custom Setting the answer is No because Access Token length is more than 255 Character and in Custom Setting we can store data upto 255 Character.
Setup -> Create -> Objects -> New -> Your Object will look like below image

Step2 – Create a Trail Account of QuickBooks From Here.
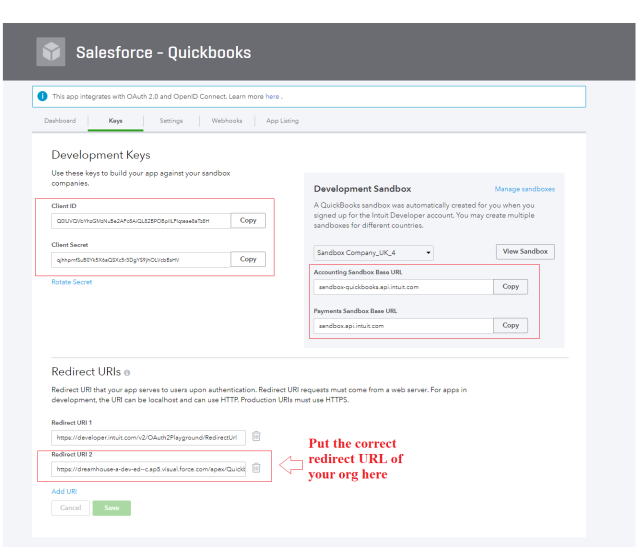
Step3 – Create a connected App into QuickBooks Developer account, Follow the steps given into this Link. Please enter a redirect URI. for example if you want to redirect into “QuickbookConnection” VF page and your org base URL is “https://dreamhouse-a-dev-ed.my.salesforce.com” then your Redirect URI will be as given below
https://dreamhouse-a-dev-ed–c.ap5.visual.force.com/apex/QuickbookConnection
Step4 – Now, in this Step get the Consumer Secret and Consumer Key and to get the key follow the steps given in This Link.
Step5 – Now, Create a Apex Class. File -> New -> Apex Class -> Name it “QuickbookConnection” -> OK. Use below code the class
This file contains bidirectional Unicode text that may be interpreted or compiled differently than what appears below. To review, open the file in an editor that reveals hidden Unicode characters. Learn more about bidirectional Unicode characters
public class QuickbookConnection{ // Replase with your Client Id public static String client_Id = 'Q0lUVQVbYhzGMzNuBe2AFc8AiQL82BPOBpIILFlqteae8aTz8H'; // Replase with your Client Secret public static String consumer_Secret = 'qjhhpmfSuB0Yk5X6aQSXc5r3DgYS9jhOLVcbBsHV'; // Replace with Your Redirect URI public static String redirect_URI = 'https://dreamhouse-a-dev-ed--c.ap5.visual.force.com/apex/QuickbookConnection'; /* * @Name - doAuthorizationQuickBooks * @Param - None * @Description - to get the authentication code from the QuickBooks Account * @ReturnType - PageReference */ public static PageReference doAuthorizationQuickBooks(){ String authorization_endpoint = 'https://appcenter.intuit.com/connect/oauth2'; String scope = 'com.intuit.quickbooks.accounting'; String final_EndPoint = authorization_endpoint+'?client_id='+client_Id+'&response_type=code&scope='+ scope+'&state=123445633443&redirect_uri='+redirect_URI; PageReference pageRef = new PageReference(final_EndPoint); return pageRef; } /* * @Name - doFetchAccessToken * @Param - None * @Description - to get the Access Token , Refresh Token and other Information after getting the authentication code * @ReturnType - void */ public static void doFetchAccessToken(){ String encodedString = EncodingUtil.base64Encode(Blob.valueOf(client_Id+':'+consumer_Secret)); String endPoint = 'https://oauth.platform.intuit.com/oauth2/v1/tokens/bearer'; String oAuthCode = ApexPages.currentPage().getParameters().get('code'); String requestBody = 'grant_type=authorization_code&code='+oAuthCode+'&redirect_uri='+redirect_URI; String errorMessage =''; HttpRequest httpReq = new HttpRequest(); HttpResponse httpRes = new HttpResponse(); Http http = new Http(); httpReq.setMethod('POST'); httpReq.setEndPoint(endPoint); httpReq.setHeader('Authorization' , 'Basic '+encodedString); httpReq.setHeader('Content-Type' , 'application/x-www-form-urlencoded'); httpReq.setBody(requestBody); try{ httpRes = http.send(httpReq); if(httpRes.getStatusCode() == 200){ Map<String, Object> response_Map = (Map<String, Object>)JSON.deserializeUntyped(httpRes.getBody()); List<Quickbooks_Token_Info__c> connectSettingInfos = new List<Quickbooks_Token_Info__c>(); connectSettingInfos = [Select Id, Name,Expires_In_Time__c From Quickbooks_Token_Info__c Where Name ='QuickBooks Setting Info']; Quickbooks_Token_Info__c quickBooksSettingInfo = new Quickbooks_Token_Info__c(); String Name = 'QuickBooks Setting Info'; String accessToken = (String)response_Map.get('access_token'); String refreshToken = (String)response_Map.get('refresh_token'); Decimal expiresIn = (Decimal)response_Map.get('expires_in'); Decimal expiresInRefToken = (Decimal)response_Map.get('x_refresh_token_expires_in'); quickBooksSettingInfo.Name = Name; quickBooksSettingInfo.Access_Token__c = accessToken; quickBooksSettingInfo.Refresh_Token__c = refreshToken; quickBooksSettingInfo.Expire_In_Seconds__c = expiresIn; quickBooksSettingInfo.Refresh_Token_Expires_In__c = expiresInRefToken; quickBooksSettingInfo.Expires_In_Time__c = System.Now().addSeconds(Integer.valueOf(expiresIn)); if(connectSettingInfos!=null && connectSettingInfos.size() > 0 ) quickBooksSettingInfo.Id = connectSettingInfos[0].Id; upsert quickBooksSettingInfo; ApexPages.addmessage(new ApexPages.message(ApexPages.severity.Confirm,'Successfully Authenticated with Quickbooks System!!!')); }else{ ApexPages.addmessage(new ApexPages.message(ApexPages.severity.ERROR,'Unexpected Error while communicating with Quickbooks API'+ 'Status '+httpRes.getStatus()+' and Status Code '+httpRes.getStatuscode())); } }catch(System.Exception e){ System.debug('#### Exception Executed '+e.getStackTraceString()); if(String.valueOf(e.getMessage()).startsWith('Unauthorized endpoint')){ errorMessage = 'Unauthorize endpoint: An Administer must go to Setup -> Administer -> Security Control ->' +' Remote Site Setting and add '+' '+ endPoint +' Endpoint'; ApexPages.addmessage(new ApexPages.message(ApexPages.severity.ERROR,errorMessage)); //return null; }else{ errorMessage = 'Unexpected Error while communicating with Quickbooks API. ' +'Status '+httpRes.getStatus()+' and Status Code '+httpRes.getStatuscode(); ApexPages.addmessage(new ApexPages.message(ApexPages.severity.ERROR,errorMessage)); //return null; } } } /* * @Name - doRefreshAccessToken * @Param - None * @Description - to get the Refresh Token and other Information after access token expires * @ReturnType - void */ public static void doRefreshAccessToken(){ String encodedString = EncodingUtil.base64Encode(Blob.valueOf(client_Id+':'+consumer_Secret)); String endPoint = 'https://oauth.platform.intuit.com/oauth2/v1/tokens/bearer'; List<Quickbooks_Token_Info__c> QBInfo = new List<Quickbooks_Token_Info__c>(); QBInfo = [Select Id, Name,Expires_In_Time__c, Refresh_Token__c, Refresh_Token_Expires_In__c From Quickbooks_Token_Info__c Where Name ='QuickBooks Setting Info']; String oAuthCode = ApexPages.currentPage().getParameters().get('code'); String requestBody = 'grant_type=refresh_token&refresh_token='; if(QBInfo!=null && QBInfo[0].Refresh_Token__c != null){ requestBody+= QBInfo[0].Refresh_Token__c; }else{ ApexPages.addmessage(new ApexPages.message(ApexPages.severity.ERROR,'Refresh Token is NULL')); } String errorMessage =''; HttpRequest httpReq = new HttpRequest(); HttpResponse httpRes = new HttpResponse(); Http http = new Http(); httpReq.setMethod('POST'); httpReq.setEndPoint(endPoint); httpReq.setHeader('Authorization' , 'Basic '+encodedString); httpReq.setHeader('Content-Type' , 'application/x-www-form-urlencoded'); httpReq.setBody(requestBody); try{ // Check if Access Token is expired or not. // if Expired then get the new Token if(QBInfo != null && QBInfo[0].Expires_In_Time__c <= System.Now()){ httpRes = http.send(httpReq); if(httpRes.getStatusCode() == 200){ Map<String, Object> response_Map = (Map<String, Object>)JSON.deserializeUntyped(httpRes.getBody()); // Assign the Value to the Existing Quickbooks info Object and at the last update the information // with new values }else{ ApexPages.addmessage(new ApexPages.message(ApexPages.severity.ERROR,'Unexpected Error while communicating with Quickbooks API'+ 'Status '+httpRes.getStatus()+' and Status Code '+httpRes.getStatuscode())); } } }catch(System.Exception e){ System.debug('#### Exception Executed '+e.getStackTraceString()); if(String.valueOf(e.getMessage()).startsWith('Unauthorized endpoint')){ errorMessage = 'Unauthorize endpoint: An Administer must go to Setup -> Administer -> Security Control ->' +' Remote Site Setting and add '+' '+ endPoint +' Endpoint'; ApexPages.addmessage(new ApexPages.message(ApexPages.severity.ERROR,errorMessage)); //return null; }else{ errorMessage = 'Unexpected Error while communicating with Quickbooks API. ' +'Status '+httpRes.getStatus()+' and Status Code '+httpRes.getStatuscode(); ApexPages.addmessage(new ApexPages.message(ApexPages.severity.ERROR,errorMessage)); //return null; } } } }
Step5 – Create a VF page. File -> New -> Visualforce Page -> Name “QuickbookConnection” -> OK. and use below code for this page
<apex:page controller="QuickbookConnection"> <apex:slds /> <apex:form id="theForm" > <apex:pageblock > <apex:pageMessages ></apex:pageMessages> <apex:actionstatus id="statusAuthQuickBooks"> <apex:facet name="start"> <div class="waitingSearchDiv" id="el_loading" style="background-color: #fbfbfb; height:100%;opacity:0.65;width:100%;"> <div class="waitingHolder" style="top: 100px; width: 91px;"> <img class="waitingImage" src="/img/loading.gif" title="Please Wait..." /> <span class="waitingDescription">Loading...</span></div> </div> </apex:facet> </apex:actionstatus> <apex:pageBlockButtons location="top"> <apex:commandButton action="{!doAuthorizationQuickBooks}" value="Authorize with Quickbooks" /> <apex:commandButton action="{!doFetchAccessToken}" value="Complete Authorzation" status="statusAuthQuickBooks" reRender="theForm" /> </apex:pageBlockButtons> </apex:pageblock> </apex:form> </apex:page>tada we have done with the coding and configuration part, now time to test the functionality. Click preview on the VF page. Click on Authorize with QuickBooks it will take you to login page of QuickBooks login with your username and password.
If you have more than 1 Sandbox it will list all the sandbox over there select one which you want to integrate.
Authorize the Application and you will be redirected to the same page now click on Complete Authorization it will create a record for the custom Object that you have created with success message


See the working in below gif Image
Now, We have access token we can make the callout to get the data from QuickBooks into Salesforce. You can find the complete code form Here.
If you have any problem then please come up into comment section.
Happy Learning 🙂 😉
Resources –


Are you able to provide a test apex class as well.
LikeLike
I have not developed the test class for the same. But to write the test class you need to create a Mock class and then use that Mock class inside the test class.
LikeLike
Hello, thanks for the code snipped. I have a question: Where exactly you are calling the method doRefreshAccessToken( ). I didn’t find any references of that method in either of your Apex class or Visualforce page.
LikeLike
Hi Sam,
I am not using that method in any other methods the method only contains the logic to refresh the token. You need to call that method from the method which is responsible for making the API call before you make API call it’s best practice to check if token is valid or NOT.
LikeLike
Awesome. I get it now. Your article is really helpful. If you could also provide a way to actually performing call outs to get/put the data from/to Quickbooks, like an interface on the Salesforce, that would be really appreciated. Thank you for your hard work.
LikeLike
Just to mention, your step 5 content for the VFP page seems to be HTML encoded, so formatting looks wacky.
LikeLike
Hi and thanks for sharing… I am getting an error in Salesforce — “Invalid type: QuickBookIntegrationInfo__c” which is referenced in the doRefreshAccessToken function.
This also brings up the question of how are you handling the token refresh since it does expire and requires a refresh frequently?
LikeLike
Well QuickBookIntegrationInfo__c was the custom setting that we user previously but now we are using a new custom object and I have replaced the code with the new version of the code.
As per refreshing the Access Token you need to create a new DateTime Field and Name it “Expires In (Time)” API name Expires_In_Time__c and then use the code provided in the blog. Now, Before making the API call check if the time that is in Expires_In_Time__c field is less than or equals to now then get the new token with the help of Refresh Token and use this new token to make the Call.
After making the API call update the Token Information if you will try before the call out you will get the Error.
Hope I am clear to you.
Thanks,
SFDCpanther
LikeLike
Thanks for the quick follow up! I was able to use your updated code and seems good but when I actually try to authorize my application (via the VFP) I am prompted via Intuit to authorize my application, but when I click the “Connect” button I am redirected to a Salesforce login screen with the following URL: (instance name changed)
https://login.salesforce.com/?ec=302&startURL=%2Fvisualforce%2Fsession%3Furl%3Dhttps%253A%252F%252Fmyinstancename.ap5.visual.force.com%252Fapex%252Fmyinstance__QuickbookConnection%253Fstate%253D123445633443%2526error%253Dinvalid_scope
I see there’s an error referenced of invalid scope — any ideas what the issue may be?
LikeLike